China Top How to Install Fire Door Frames for Smoke Control?

Time:2026-10-25 Author:Madeline
0%

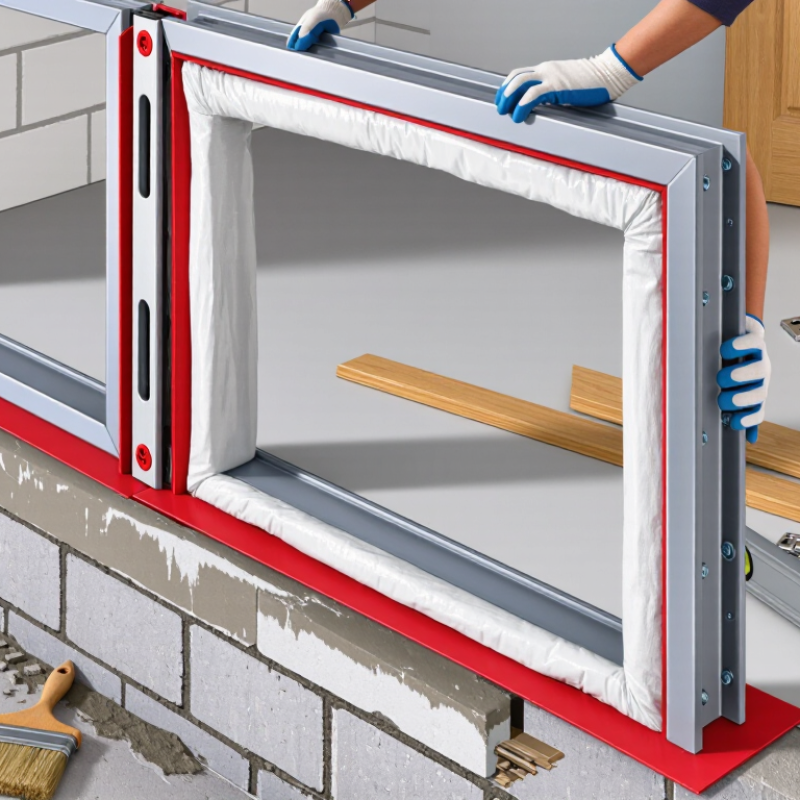
A fire door frame is more than a metal or timber border. It forms a tested barrier against flames, heat, and smoke. Poor alignment can create hidden leakage paths around the door leaf. This guide explains how experienced installers prepare the opening, position the frame, and protect every joint. It also addresses the question, “How to install a fire door frame to prevent smoke leakage?” The answer depends on the complete, approved door assembly, not the frame alone.

The wall opening should match the manufacturer’s approved dimensions. Remove dust, loose mortar, and damaged materials before installation. Check the frame for twisting, dents, and missing seals. Set it plumb, level, and square. Small errors matter. Secure it with approved fixings at the specified spacing. Do not drill random holes or alter the frame without written approval. Pack gaps with compatible fire-rated materials. Apply tested sealant where the installation instructions require it. Intumescent seals must sit continuously, without cuts, paint, or compression damage. The door should close firmly and latch without force.

Qualified installers should verify the frame, door leaf, hinges, closer, lock, seals, and wall system together. Each component must match the tested fire-resistance rating. Local building requirements and certified manufacturer instructions remain essential references. A practical inspection should include a torch check around the frame and a paper test at the seals. Smoke control is not achieved by appearance alone. Real sites are rarely perfect. Even careful work may reveal uneven masonry or an unexpected gap. That detail deserves correction before handover. Keep installation records, product certificates, and inspection notes for future maintenance.
China Top How to Install Fire Door Frames for Smoke Control?

Fire Door Frame Types and Smoke-Control Requirements

China Top How to Install Fire Door Frames for Smoke Control?

Fire door frames usually include steel, timber, or composite types. Steel frames suit demanding areas because they resist heat and impact well. Timber frames can work in approved assemblies, but their seals and finishes need closer inspection. Composite frames may reduce weight, yet their certification must match the complete door set.

A fire-rated frame is not automatically smoke-tight. The frame, door leaf, hinges, closer, latch, seals, and threshold must work as one tested assembly. Check the approved installation instructions before fixing the frame. Keep the opening plumb, level, and square. Uneven gaps can allow smoke to pass quickly. Measure them with a feeler gauge, not only by sight. Small gaps matter.

Install approved intumescent and smoke seals continuously around the frame. Avoid cutting corners around hinges or latch areas. Seal the joint between the frame and wall with a compatible fire-stopping material. Do not fill it with ordinary foam. Check that the door closes fully from an open position and latches without force. A smoke pencil can reveal air movement around the edges. Recheck after nearby construction is complete. Dust, paint, and floor changes often affect the threshold. One detail I once underestimated was a slightly raised floor finish; it stopped the door from closing properly. Record frame type, seal condition, clearances, and test references for inspection.

Tools, Materials, and Site Preparation

China Top: How to Install Fire Door Frames for Smoke Control?

Tools, materials, and site preparation decide whether a fire door frame performs correctly. On active sites, I use a tape measure, laser level, square, drill, shims, torque wrench, and personal protective equipment. The opening must be checked for width, height, plumb, floor level, and wall alignment. Small errors can create uneven gaps. A rushed measurement is an expensive lesson.

Use a listed frame, approved anchors, compatible grout, packers, and tested smoke seals. Confirm that the wall’s fire-resistance rating matches the door assembly. NFPA 80 requires fire door assemblies to be installed and maintained according to their listing and tested conditions. NFPA’s Fire Loss in the United States During 2023 reported approximately 1.39 million fires and 3,670 civilian fire deaths, showing why installation details deserve serious control. Smoke protection depends on continuous seals and controlled clearances, not appearance alone.

Keep the floor clean before setting the frame. Dust can hide gaps beneath the jambs. Check the frame diagonals before fixing each anchor. Then inspect hinge-side plumb, strike-side alignment, and the finished threshold. A dry fit often reveals problems early. Still, site conditions can change after installation, and one inspection may not be enough. Record measurements, photographs, anchor locations, and any deviation for the responsible inspector. Testing is not paperwork; it is evidence.

China Top How to Install Fire Door Frames for Smoke Control? - Tools, Materials, and Site Preparation

Installation Stage Tools Required Materials or Components Recommended Site Conditions Key Installation Requirements Smoke-Control Check
1. Review Approved Documents Tape measure, level, document checklist, flashlight Approved door schedule, frame drawings, installation instructions, fire-rating documentation Confirm the wall type, opening number, fire-resistance rating, door swing, and frame profile before work begins. Use the frame and door assembly only in the configuration tested or approved for the required application. Verify that the frame rating matches the specified fire-door assembly and local code requirements.
2. Inspect the Wall Opening Spirit level, plumb bob or laser level, steel rule, square, measuring tape Temporary protection materials, approved repair mortar or fire-rated patching material The opening should be structurally sound, clean, dry, and free from loose masonry, dust, and excessive moisture. Measure width, height, reveal depth, squareness, and wall thickness. Check that the opening is large enough for the specified frame clearance. Eliminate gaps or cracks around the opening that could allow smoke leakage.
3. Prepare the Frame Work gloves, soft mallet, screwdriver, drill, approved fastener driver Fire-rated door frame, frame anchors, hinge reinforcements, strike reinforcement, temporary spreader Store the frame flat or securely supported in a dry area to prevent distortion, corrosion, or impact damage. Check that jambs are straight, corners are square, hardware reinforcements are present, and the frame is not twisted or damaged. Confirm that the frame has continuous, undamaged sealing surfaces for the smoke seals.
4. Position and Plumb the Frame Laser level or spirit level, clamps, wedges, measuring tape, square Non-combustible packers or shims, temporary bracing, approved anchors Keep the frame centered or positioned as shown on the approved drawings, with the required clearance from adjacent finishes. Set the hinge jamb plumb first, then align the strike jamb. Keep the head level and maintain equal frame-to-wall gaps. A distorted frame can prevent the door from closing tightly and may create a continuous smoke path.
5. Secure the Frame Drill, drill bits suitable for the wall, torque driver, level, measuring tape Approved steel anchors, expansion anchors or other specified fixings, non-combustible shims Fixings must be suitable for the substrate, such as concrete, masonry, or steel stud construction. Install anchors at the locations and spacing stated in the approved installation instructions. Do not use unapproved plastic anchors or improvised fixings. Ensure the frame remains plumb and square after every anchor is tightened.
6. Fill the Frame-to-Wall Joint Caulking gun, pointing trowel, putty knife, cleaning brush, moisture meter if required Approved fire-resistant mortar, mineral-fiber packing, fire-rated sealant, backing material where specified Joint surfaces must be clean and free from oil, loose dust, and standing water. Follow the product temperature and curing limits. Fill the perimeter joint continuously and completely with the specified fire-stopping system. Do not leave voids behind the visible sealant. A continuous, correctly installed perimeter seal helps limit smoke movement through the wall-frame interface.
7. Install the Door and Hardware Screwdriver, torque driver, level, hinge adjustment tool, gap gauge Rated door leaf, hinges, latch or lockset, closer, strike plate, smoke seals, signage Install hardware only after the frame is stable and the surrounding fire-stopping materials are sufficiently cured. Use only hardware compatible with the tested or approved door assembly. Secure hinges and hardware with the specified fasteners. The closer must return the door to the fully closed position, allowing the latch to engage without manual assistance.
8. Fit and Inspect Smoke Seals Utility knife, measuring tape, seal-fitting tool, soft cloth Listed or approved intumescent and/or compression smoke seals, adhesive or retainers as specified Seal channels must be clean, continuous, and free from paint buildup or debris. Install seals without stretching, cutting corners, or leaving unsealed interruptions at the head, jambs, or meeting edges. Check that the seals make consistent contact with the door leaf when closed but do not prevent positive latching.
9. Adjust Clearances and Operation Gap gauge, feeler gauge, level, screwdriver, torque driver Approved adjustment shims, replacement fasteners, compatible seal sections if needed Carry out checks after the wall finishes and floor finishes are complete or at their final installed levels. Verify uniform margins, smooth swing, correct latch engagement, and full contact with the frame seals. Avoid excessive gaps. The door should close from any normal opening position and leave no visible smoke path around the perimeter.
10. Complete Final Inspection Inspection checklist, camera, level, gap gauge, flashlight Installation records, product certificates, maintenance instructions, identification label The completed assembly must be clean, undamaged, accessible, and free from temporary wedges or obstructions. Record the frame location, rating, hardware, seal condition, clearances, closing operation, and any corrective work. Do not leave the door wedged open unless an approved hold-open and release system is provided.
11. Handover and Maintenance Maintenance checklist, inspection form, basic adjustment tools Operation instructions, inspection schedule, replacement seal information, fire-door signage Provide the building operator with access to the frame, hinges, closer, latch, and perimeter seals for future inspection. Inspect the assembly periodically and after alterations, impact, hardware replacement, or building movement. Keep seals intact, maintain positive latching, and repair smoke-leakage paths immediately.

How to Measure and Position the Fire Door Frame

How to Install Fire Door Frames for Smoke Control

How to Measure and Position the Fire Door Frame

Accurate measurement begins before the frame reaches the site. Check the finished wall opening, not only the rough opening. Measure width at the head, middle, and sill. Then measure height on both jambs and at the center. Record the smallest dimensions. Uneven masonry can hide several millimeters of error.

Confirm the wall type, frame profile, door thickness, and required clearances against the tested assembly and local fire requirements. The frame must sit on a sound, continuous surface. Position each jamb plumb, then check the head level. Keep the frame centered unless the approved installation detail requires another position. A small twist can prevent the smoke seals from contacting evenly. That detail is easy to miss.

Before final anchoring, hang the door and inspect the reveal on all sides. It should remain consistent as the door opens and closes. Smoke seals need gentle, continuous contact, not heavy compression. I would remeasure twice rather than force a frame into place. Site pressure often encourages shortcuts, but an apparently minor gap may affect smoke control. The installation record should include measurements, fixing locations, and photographs. Mistakes become harder to correct after the wall finish is completed.

Step-by-Step Fire Door Frame Installation

Step-by-Step Fire Door Frame Installation

Before installation, confirm the approved door assembly, frame rating, wall type, and local building requirements. A fire door works as one tested system, not as separate products. Inspect the frame for dents, twisted corners, missing anchors, and damaged seals. In practice, walls are rarely perfect.

Set the frame into the opening and check both diagonals. They should match closely. Use a spirit level to keep the jambs plumb, then secure the head without forcing the steel into shape. Keep it square. Fix anchors at the specified points, using suitable fasteners for masonry, concrete, or metal studs. Do not improvise.

Fill the gap around the frame with an approved fire-resistant material. Ordinary foam may fail under heat and smoke pressure. Check the clearance around the door leaf; excessive gaps can reduce smoke control. Install hinges, the closer, latch, and intumescent seals according to the tested assembly instructions. The door should close fully from a normal open position, without scraping the floor. A neat frame can still be unsafe if the latch misses its strike. Test the door several times, including slow closing and slight pressure on the leaf. Record the frame alignment, gaps, hardware, and final inspection. I would also photograph hidden anchors before wall finishing. That detail matters.

Sealing, Inspection, and Compliance Testing

China Top: How to Install Fire Door Frames for Smoke Control?

Smoke control begins with a correctly fitted frame, not only the door leaf. NFPA’s 2023 U.S. fire report recorded about 1,388,500 fires and 3,670 civilian fire deaths. Smoke often spreads before flames reach occupants. Install the frame plumb, square, and firmly anchored to the wall. Keep the opening consistent. A crooked frame can compress the gasket unevenly and create a visible leakage path.

Seal every joint carefully. Use only tested, compatible fire-rated sealant around the frame perimeter. Do not fill large voids with ordinary foam. Maintain the manufacturer’s required clearance between the door and frame. Check hinges, latches, closer action, and the meeting stile. The smoke seal must touch continuously, without cuts, paint buildup, or loose corners. Small gaps matter.

Inspection needs evidence. Record frame dimensions, anchor spacing, sealant type, installation dates, and corrective work. For U.S.-referenced projects, NFPA 80 addresses fire door installation, while UL 1784 evaluates smoke leakage. In China, confirm applicable requirements under GB 12955, GB 50877, and local authority guidance. Testing should include pressure conditions and repeated door operation. A practical field check uses light, feeler gauges, and smoke pencils where permitted. It is simple, but not conclusive. Site teams sometimes approve clean-looking frames too quickly. Independent inspection and documented compliance testing remain necessary.

FAQS

What types of fire door frames are commonly used?

Steel frames resist heat and impact well. Timber frames need careful seal and finish inspection. Composite frames are lighter. Their certification must match the complete door assembly.

Does a fire-rated frame automatically prevent smoke leakage?

No. The frame, door, hinges, closer, latch, seals, and threshold must work together. Smoke control depends on the tested assembly.

How should the frame opening be prepared?

Keep the opening plumb, level, and square. Uneven gaps create fast smoke paths. Measure clearances with a feeler gauge.

Where should smoke and intumescent seals be installed?

Install approved seals continuously around the frame. Avoid cuts near hinges and latch areas. Paint buildup can interrupt contact.

What material should seal the frame-to-wall joint?

Use a compatible, tested fire-stopping material. Do not use ordinary foam for large voids. That shortcut can weaken protection.

How can installers check whether the door closes correctly?

Open the door and release it. It should close fully and latch without force. Check the closer, hinges, latch, and threshold.

What simple field checks can reveal possible smoke leakage?

Use light, feeler gauges, and a smoke pencil where permitted. These checks can reveal air movement. They are not conclusive.

What construction details often cause problems after installation?

Dust, paint, and raised floor finishes can block full closure. I once underestimated a slightly raised floor. The door stopped closing properly.

What inspection records should be kept?

Record frame dimensions, anchor spacing, seal condition, sealant type, installation dates, and corrective work. Keep testing references too. Clean appearance alone proves little.

When is independent inspection useful?

It is useful when site teams approve frames too quickly. Recheck after nearby construction ends. Documented compliance testing provides stronger evidence.

Conclusion

This guide explains how to install fire door frames for effective smoke control, beginning with the main frame types and the requirements for maintaining a reliable smoke-resistant barrier. It covers the tools, materials, and site preparation needed before work begins, including checking the opening, wall condition, floor level, and surrounding clearances. Accurate measurement and correct positioning are essential to ensure that the frame remains plumb, level, square, and properly aligned with the door leaf and hardware.

The step-by-step installation process includes securing the frame, checking its stability, and preserving the required gaps for safe operation. It also answers the key question: How to install a fire door frame to prevent smoke leakage? The guide emphasizes using suitable fire-rated seals and approved materials around the frame, followed by careful inspection of joints, anchors, gaps, and door movement. Finally, it outlines compliance checks and testing procedures to confirm that the completed installation provides dependable smoke control and meets the applicable project requirements.

Madeline

Madeline

Madeline is a dedicated marketing professional with a wealth of expertise in our company's core offerings. With a keen understanding of the industry, she brings a unique perspective to her role, consistently delivering high-quality content that highlights the superior aspects of our products. As......